Installation Instructions
Small Auxiliary Mirror Installation
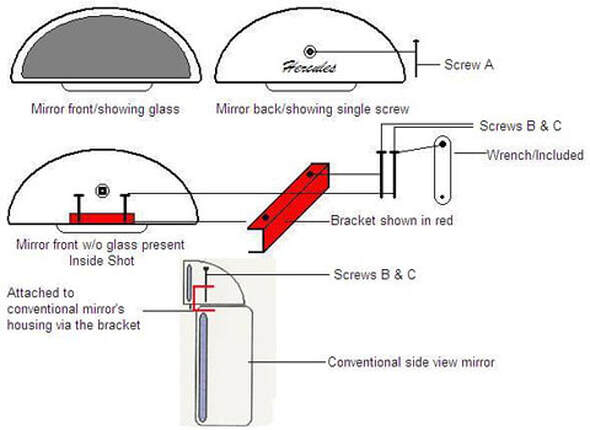
Specs: 5 3/4" W X 2 4/8" H X 2" D
- Unscrew screw A from the back of the mirror.
- Take out the glass mirror from it's housing.
- Slide the Auxiliary Mirror on to the conventional mirror's inside housing using the bracket.
- Using the wrench provided, tighten screws B & C until bracket tightly clamps to existing mirror's housing.
- Place Auxiliary Mirror's glass back in it's housing and tighten screw A in the back.
- Adjust Auxiliary Mirror to desired angle using thumbs.
Medium Auxiliary Mirror Installation
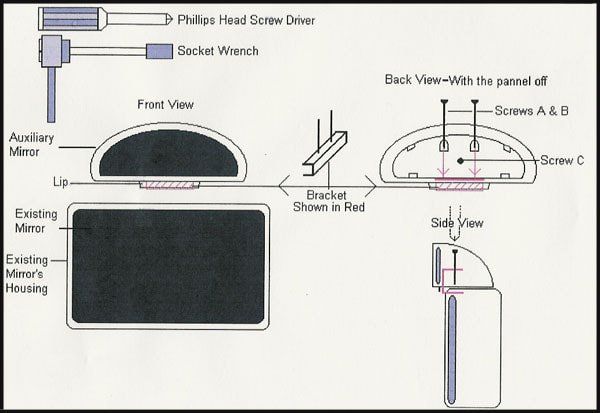
- Pop off plastic Panel on the back of the auxiliary mirror using a regular flat screw driver.
- Loosen screws A & B inside the Auxiliary Mirror unit from the top angle of the mirror - about 1/2 Inch using either a 1/4" socket or phillips head screw driver. NOTE: If you loosen screws A & or B too much, you could lose the bracket inside the mirror housing. If this happens, follow instructions A-D on instruction set B.
- Slide the new mirror over the existing side view mirror allowing the bracket to slide between the mirror and the mirror's housing.
- Tighten screws A & B until the mirror is securely connected.
- Snap plastic panel back on the mirror (note: this panel or the whole mirror can be painted to match your vehicle).
- Adjust the new mirror to desired angle using thumbs.
Instructions B:
- Unscrew the C screw from the back middle of the mirror.
- Take out the mirror from the front. This will give you access to the inside components.
- Re-align screws A & B with the bracket and tighten until attached.
- Put mirror back in place and tighten screw C.
Large Auxiliary Mirror Installation
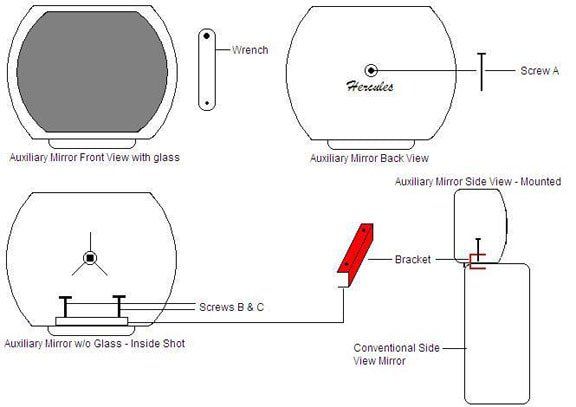
- Unscrew screw A from the back of the mirror.
- Take out the glass mirror from it's housing.
- Slide the Auxiliary Mirror on to the conventional mirror's inside housing using the bracket.
- Using the wrench provided, tighten screws B & C until bracket tightly clamps to existing mirror's housing.
- Place Auxiliary Mirror's glass back in it's housing and tighten screw A in the back.
- Adjust Auxiliary Mirror to desired angle using thumbs.